Support
Click the life raft symbol to bring up the Support page.

Start
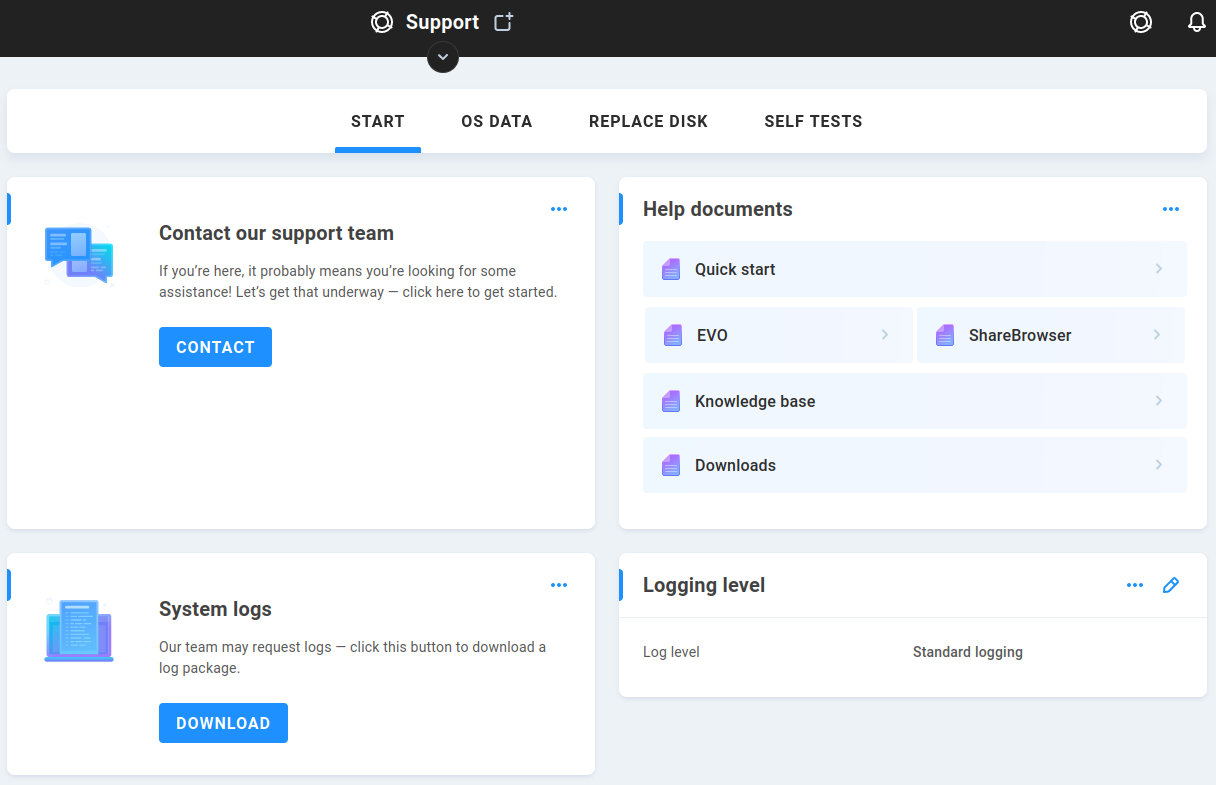
Contact our support team
Contact redirects to https://www.studionetworksolutions.com/support/ so you can quickly create a support ticket if assistance is needed.
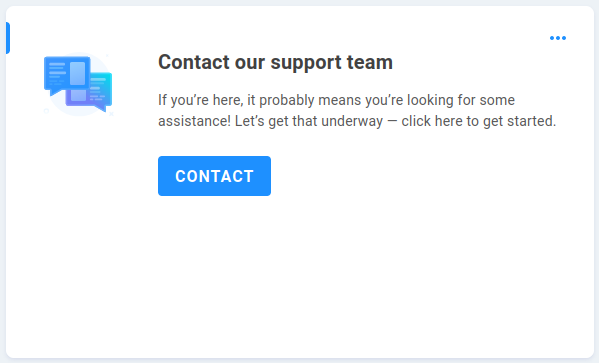
Help documents
Quick start links to EVO’s Quick Start page.
EVO links to the latest EVO guide. This may not be the correct guide for your EVO version, so confirm the version number listed in the EVO interface to ensure accurate information from the guide. Guides for previous EVO versions can be provided by the SNS support team.
ShareBrowser links to the latest ShareBrowser guide. This may not be the correct guide for your ShareBrowser version, so confirm the version number listed at the ShareBrowser page and in the ShareBrowser client interface to ensure accurate information from the guide.
Knowledge base links to the SNS Knowledge Base, where supplemental articles about specific considerations may be found. Some articles require registration to view.
Downloads links to https://www.snsftp.com/public/ where current and legacy client software versions are available for download.
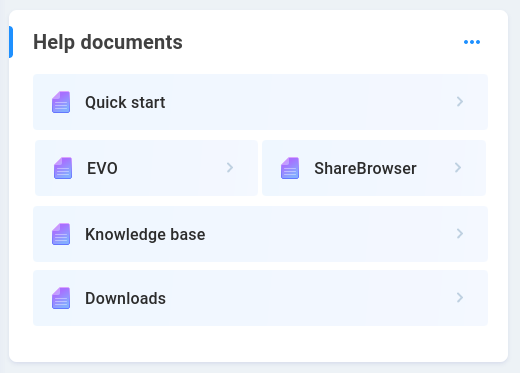
Push diagnostics
Push vital details about this EVO (such as CPU, uptime, OS version, model, and serial number) to SNS on an infrequent basis. These details can help our support team improve its ability to assist with your system. Sensitive information such as users, passwords, and data in your pools/logical disks will not be sent.
Push diagnostics - Disabled by default, and typically enabled during preconfiguration to register the SNS chassis number.
Serial number displays the SNS serial number if provided.
Registration ID displays the registration ID issued when registering your EVO with SNS at https://studionetworksolutions.com/registration/
Frequency shows the frequency with which EVO will push its diagnostics.
Click the pencil to add or edit any of these values.
System logs
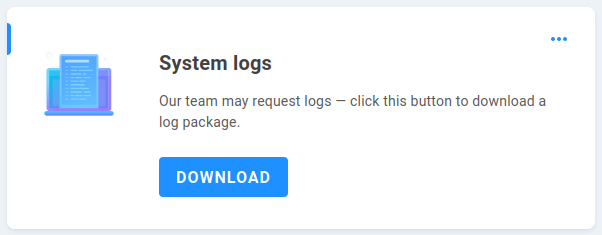
Our team may request logs at some point — click this button to download a log package.
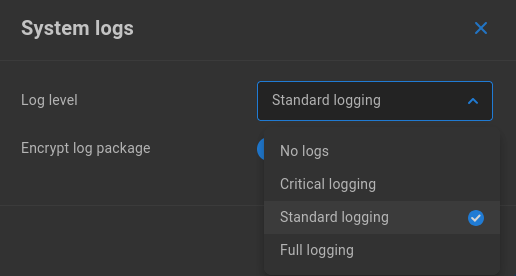
By default, a standard logging level is used for EVO component reporting. The verbosity of output can be adjusted, and the chosen logging level affects system resource usage.
Click the pencil to edit logging level options. Options from least impactful to most resource-consuming are No logs, Critical logging, Standard logging, and Full logging.
Note
If Full logging is selected, a new option appears to automatically revert to default logging after a chosen period of time (5, 15, 30, or 45 days).
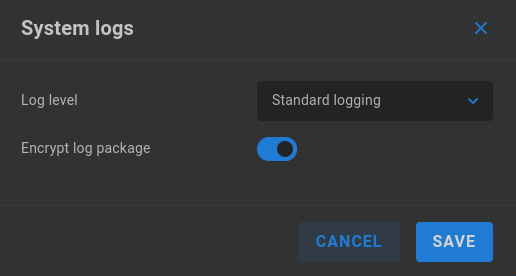
Encrypt log package - Logs are encrypted by default, since they may contain information including user names, details about files, and other system values. Toggle this setting at any time to download logs that are more easily extracted.
Syslog
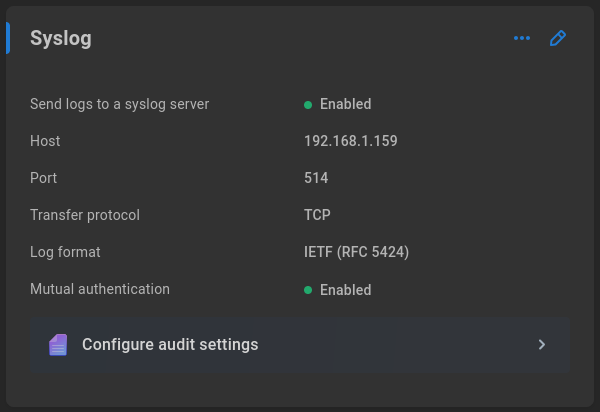
Syslog is a standard that allows for centralized logging of multiple networked devices, collected at a central syslog server.
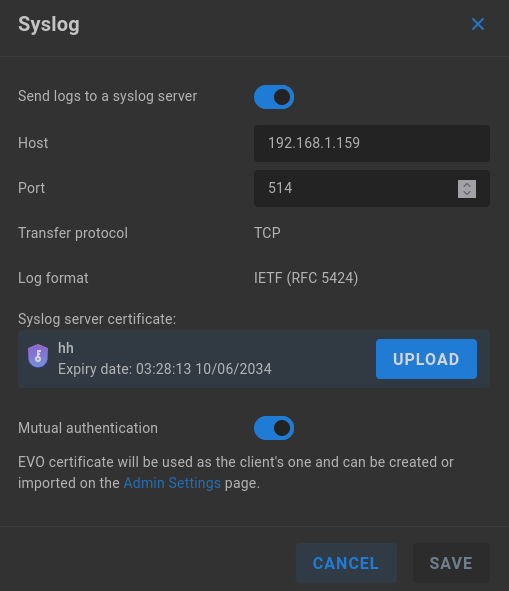
Send logs to a syslog server - Toggle to configure EVO to submit logs to a syslog server.
Host - Enter the IP address of the syslog server.
Port - 514 is the default syslog port. Set this to match the syslog server communication port.
Transfer protocol - TCP
Log format - IETF (RFC 5424)
Syslog server certificate - Upload the SSL CA certificate provided by the syslog server.
Mutual authentication - When toggled on, EVO will send its own SSL certificate, used for HTTPS, to authenticate against the syslog server. The certificate will be used for the syslog client (EVO), and can be created or imported on the Admin Settings page.
Configure audit settings - Shortcut to the User Auditing section
Note
Some syslog server software may strictly require Mutual Authentication.
OS Data
The EVO operating system is on a disk separate from the data drives installed at the front of the chassis. The OS data page presents information and options relating specifically to the operating system.
8 Bay and 16 Bay EVO systems include a spare operating system disk as an added protection in case of an issue with the default and reserve copies of the operating system on the primary OS disk.
If there’s ever an issue with the primary OS disk, it’s possible to boot into the reserve partition from the Console menu selection or with assistance from SNS.
If there’s ever a need to replace the primary OS disk, EVO can be shut down and the spare disk moved to the primary slot. Following recovery, a replacement disk can be installed to act as the new spare disk.
Warning
Primary and spare OS disks need to be installed during any upgrade. If replacing a spare, shut down EVO to install it to the spare drive slot (moving the in-use disk if needed), and check the Partition status to confirm its content.
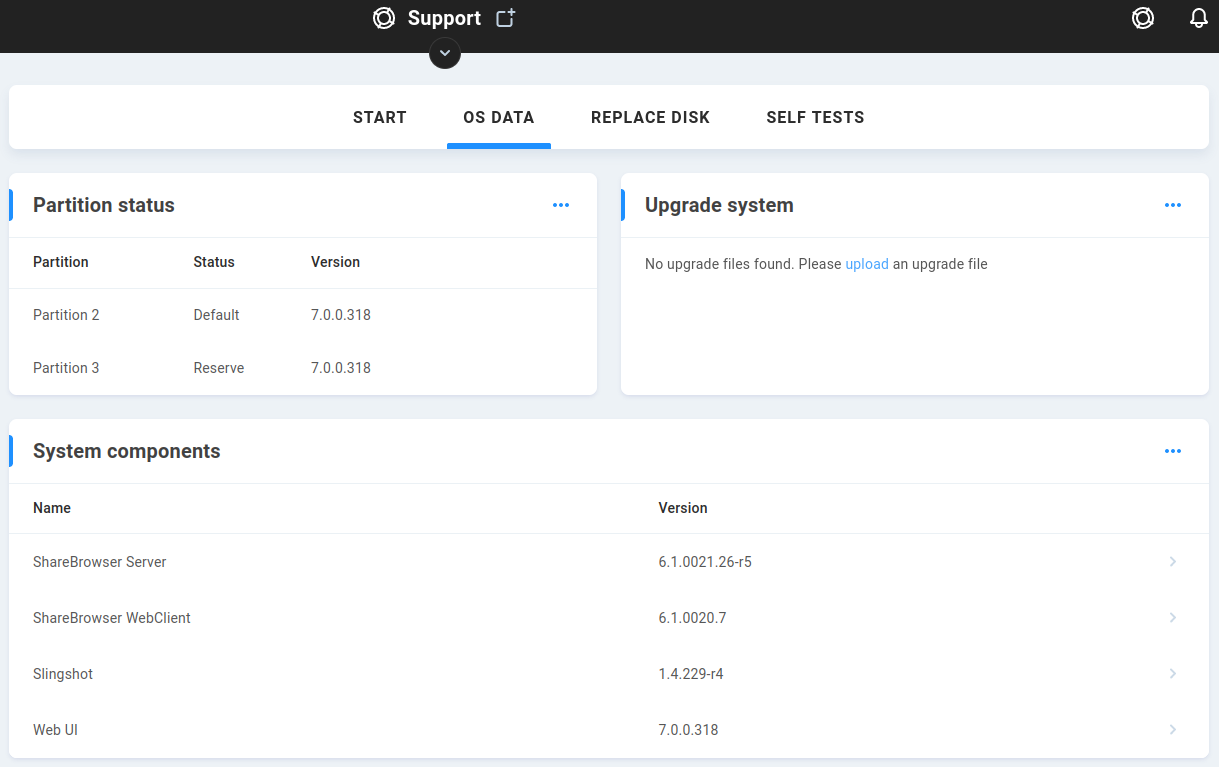
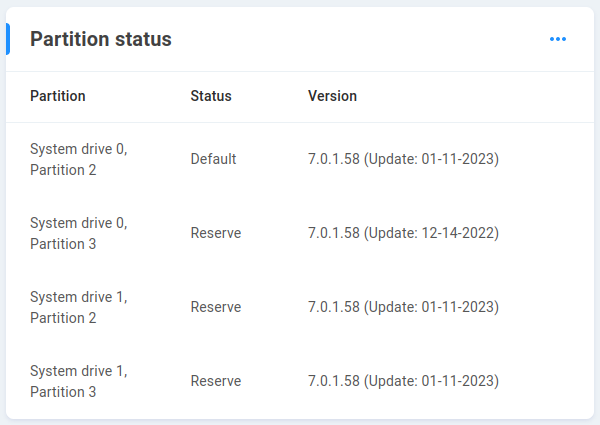
Partition status
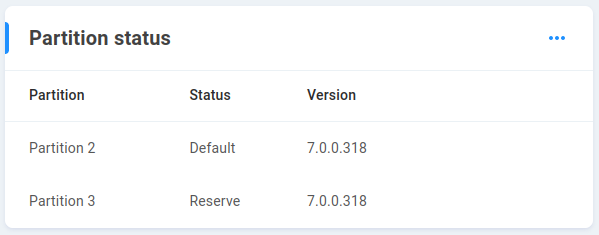
EVO keeps two copies of the operating system on its primary OS disk, separate from the data disks installed at the front of the chassis. 8 and 16 bay systems include a secondary disk with its own primary and reserve partition copies of the OS version. The secondary disk’s partitions are written when running an upgrade on the primary disk.
The status for each partition on the OS disk(s) can be verified at the Partition Status card, which lists the OS version written to each.
The above image shows a Prodigy with two partitions (primary OS disk) available, while the below is from a 16 bay system with four partitions available (primary and secondary OS disk).
Warning
To ensure version parity, make sure both disks are installed during any upgrade. If a secondary OS disk is confirmed to be physically present and is not displayed in the web interface, then it may not have an active internal connection. Contact SNS to ensure the secondary disk is available.
Upgrade system

Upload an EVO image file when it’s time to upgrade. See Contacting Studio Network Solutions to stay up to date with product news and get in touch with the support team to ask about upgrade options.
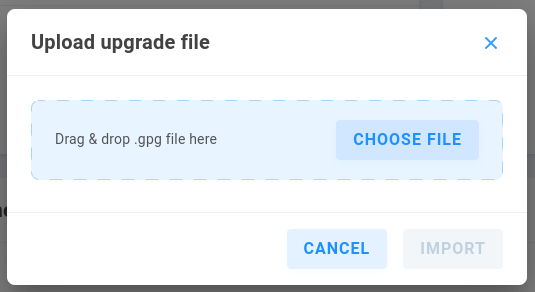
When the upgrade is completed, EVO will prompt for a reboot, after which it will boot into the partition that was just upgraded (the currently booted partition becomes the reserve partition).
Upgrades are generally performed a second time after confirming expectations following the first upgrade, to ensure all partitions are able to correctly boot and present the shared storage.
System components
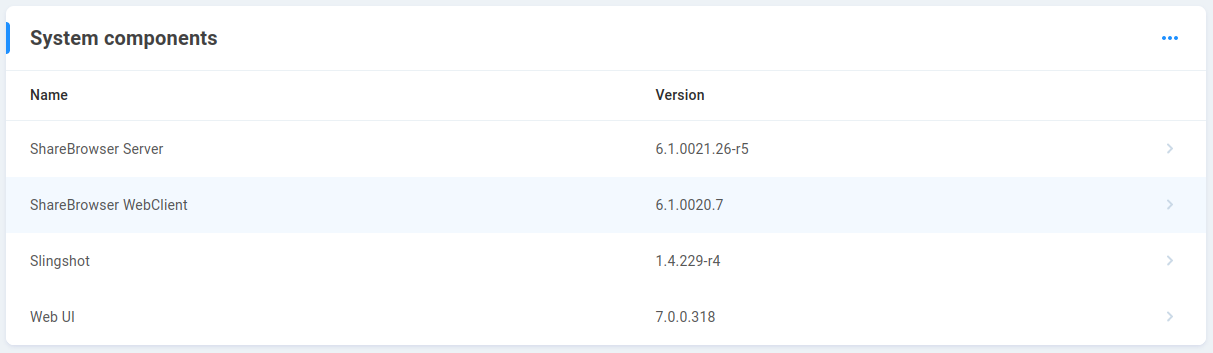
Information about supplemental components in EVO (some of which may be manually activated) are displayed here. These components are included in the EVO OS, and do not normally need to be upgraded, though there are situations where it may make sense to modify a particular component.
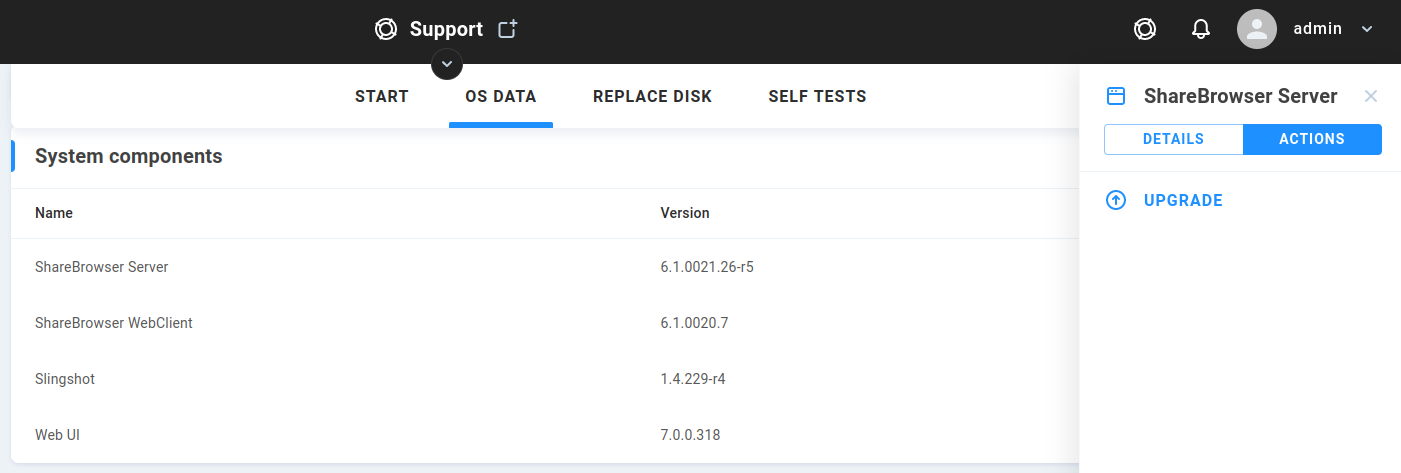
Click a component to upgrade it individually.
Component databases
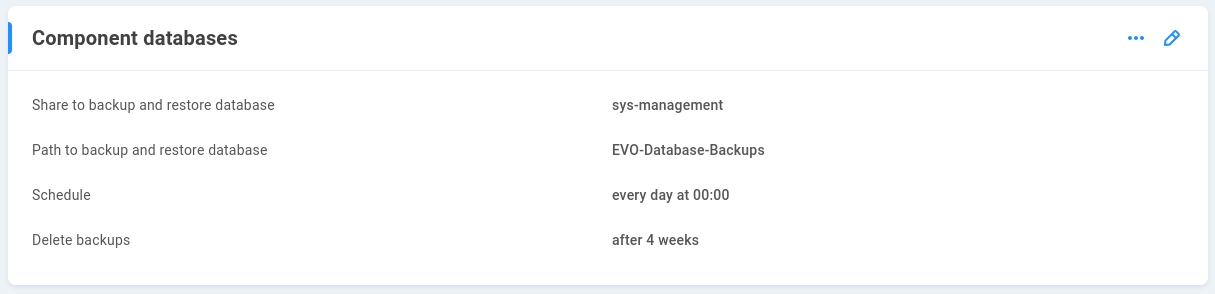
The ShareBrowser and Slingshot components require configuration to ensure database preservation. The details and options for configuration are presented here.
Share to backup and restore database displays the selected backup location for the components.
Path to backup and restore database displays the path to the directory used for backup on the share selected above.
Schedule displays the recurring day(s) and time the database should be backed up. The default is every day at midnight.
Delete backups displays the retention time for backups, after which they will be automatically purged. Backups are stored for 4 weeks by default.
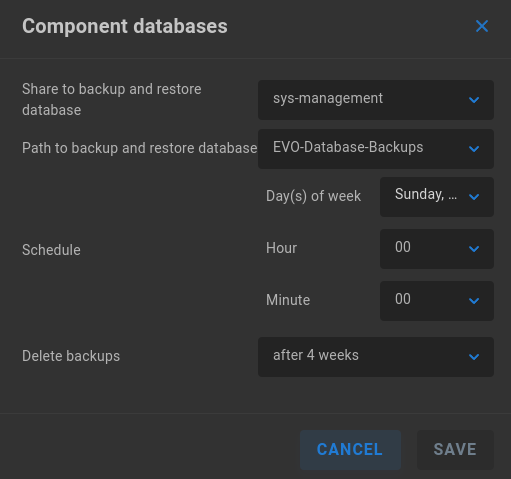
Click the pencil to edit the above values.
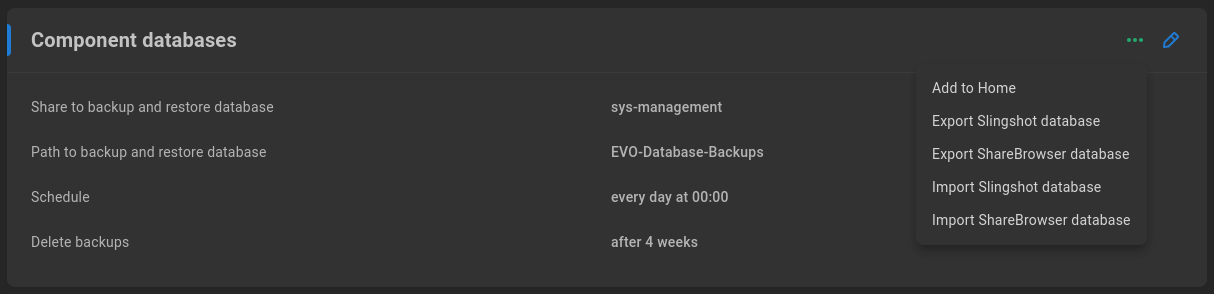
Click the three dots to import or export a ShareBrowser or Slingshot database.
Export will allow for download to your local machine. Import will allow for upload from your machine, or “use restore location” can be selected; this will show the contents of the directory that’s been configured for automatic database backup, and allow for selection of the backup version to import. When importing a Slingshot database, a previous configuration can be used, or a new one created.
Installed plug-ins

In addition to the standard ShareBrowser and Slingshot components included with EVO, there may be some functionality that can be added by an SNS-provided plugin. This section displays details for any added plug-ins, as well as the option to install one.
Recover configuration
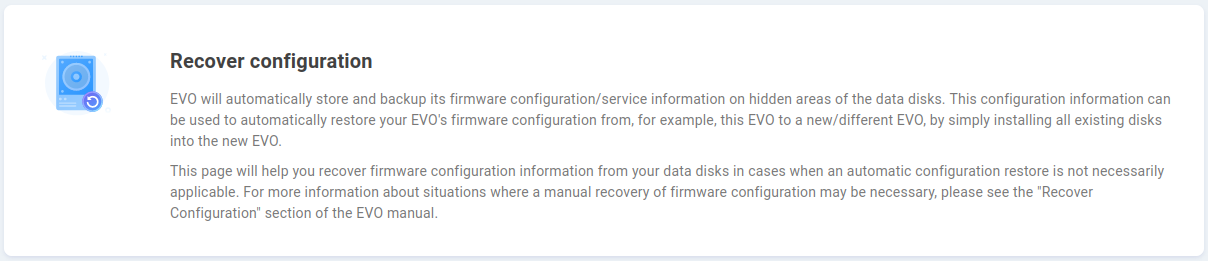
EVO will automatically store and backup its firmware configuration/service information on hidden areas of the data disks. This configuration information can be used to automatically restore your EVO’s firmware configuration from, for example, this EVO to a new/different EVO, by simply installing all existing disks into the new EVO.
This page will help you recover firmware configuration information from your data disks in cases when an automatic configuration restore is not necessarily applicable.
For example, if disks are moved from one EVO to another, when the system boots, it will identify its original EVO configuration (even if that includes no disks), as well as the configuration stored on the newly-installed disks. The administrator will need to choose whether the existing configuration should be used and disks should be treated as new, with the other EVO configuration disregarded, or to recover the configuration brought over by the disks, overwriting the existing EVO configuration.
Note
Recovery will take some time, during which the web interface may not be available. Information about the startup process can be verified with a connected keyboard and display.
Warning
If there’s a need to fail over to the spare OS disk and you’d like to install a new spare drive, shut down EVO when convenient and move the in-use OS disk to the empty slot and install the new spare disk to the original spare slot. While EVO can run on a disk in either OS drive position, it expects the primary and spare disks to be connected according to their labeled positions.
Configuration backups
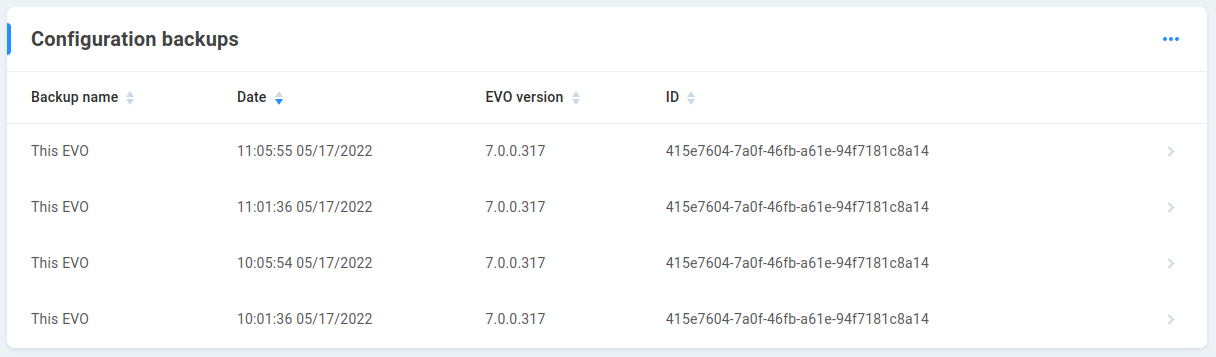
All valid found EVO configurations are listed, with name, date, version, and unique ID displayed. These are automatically created, and if differing configuration files are found, the administrator can decide which should be recovered or destroyed.

Select a backup from the list to recover or destroy that configuration.
Warning
If differing configurations are found at boot, a decision needs to be made about “which” EVO should be used. Ensure the selected configuration file is correct according to its timestamp before committing to recovering or destroying a configuration.
EVO OS disks

Information about the operating system disk(s) is displayed. Click on the line to bring up its Actions.
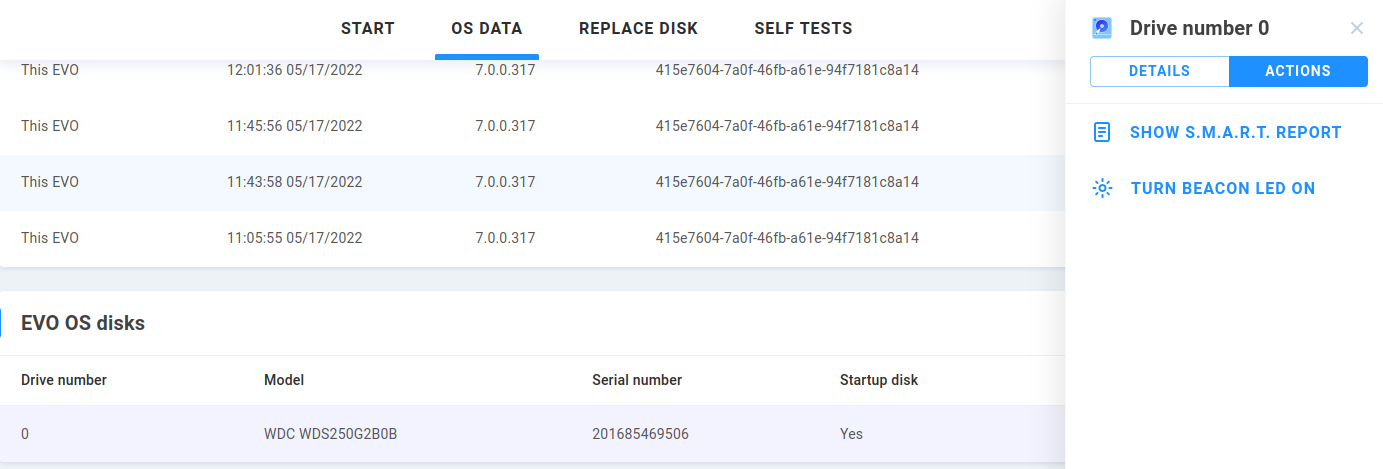
Show S.M.A.R.T. Report - Displays the SMART stats for the physical drive.
Turn Beacon LED on/off - Toggles illumination of the LED at the physical drive for visual identification of the device.
Replace Disk
Unlike OS Data, this section deals with the data drives. While EVO uses enterprise-class disks that consistently have the lowest failure rates in the industry, on a long enough timeline, a hardware failure can be expected.
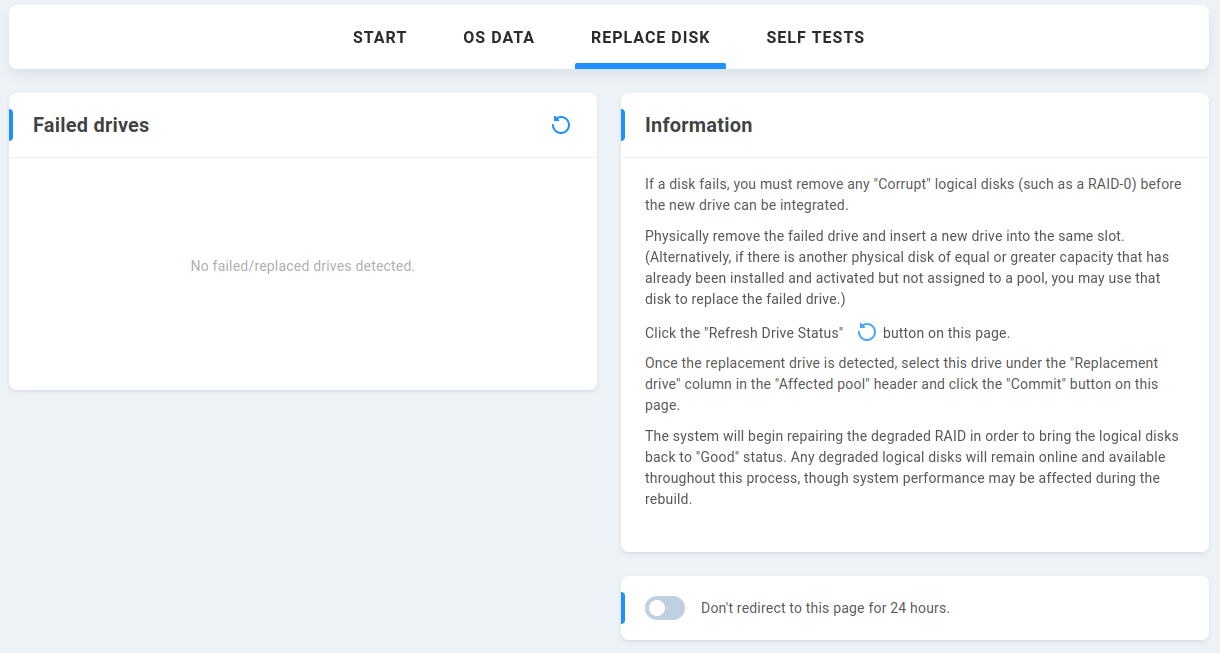
Failed drives
Any physical data disks that have been automatically identified as failed are presented here. Click the refresh icon to initiate a manual scan for failed disks.
Information
If the need arises to replace a disk (see Alerts to ensure you’re notified immediately), follow the instructions in the Information section on this page:
Physically remove the failed drive and insert a new drive into the same slot. (Alternatively, if there is another physical disk of equal or greater capacity that has already been installed and activated but not assigned to a pool, you may use that disk to replace the failed drive.)
Click the “Refresh Drive Status” button on this page.
Once the replacement drive is detected, select this drive under the “Replacement drive” column in the “Affected pool” header and click the “Commit” button on this page.
The system will begin repairing the degraded RAID in order to bring the logical disks back to “Good” status. Any degraded logical disks will remain online and available throughout this process, though system performance may be affected during the rebuild.
Don’t redirect to this page for 24 hours. - Toggle this on if you’ve been made aware of the drive failure and interface attempts to inform are no longer needed.
Self Tests
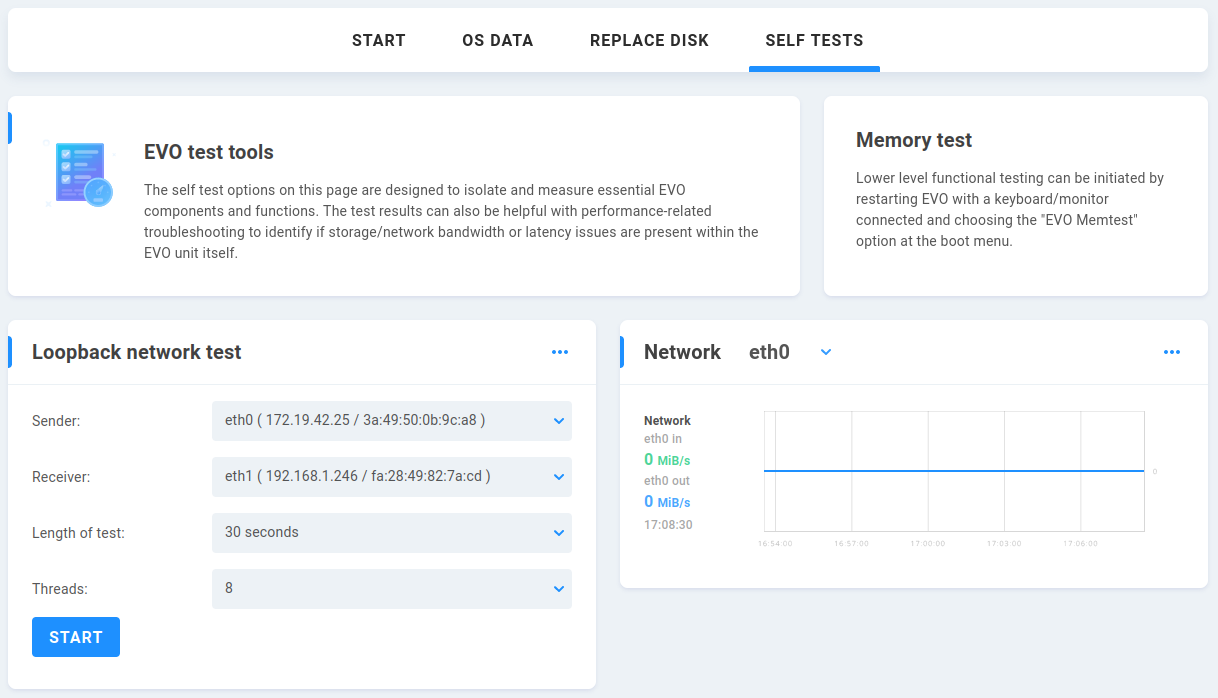
EVO test tools
The self test options on this page are designed specifically for troubleshooting, by individually assessing essential EVO components and functions. The test results can be helpful by isolating considerations to identify if storage/network bandwidth or latency issues are present within the EVO unit itself, and are not intended for gathering benchmarks, as the tests are not reflective of real-world use from connected client machines.
Warning
EVO’s self tests are intended to fully exercise the network/disks, which may be disruptive to users.
Memory test
Lower level functional testing can be initiated by restarting EVO with a keyboard/monitor connected and choosing the “EVO Memtest” option at the boot menu.
Loopback network test
This test allows for testing Ethernet port communication without involving the file system (disks), and is used to confirm network hardware functionality.
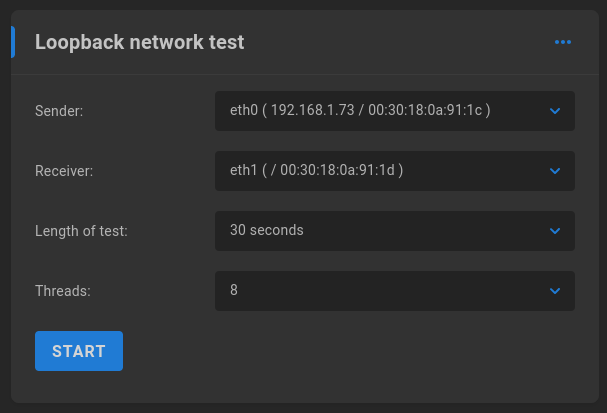
The Loopback Network Test is performed by connecting a cable from one EVO Ethernet port to another, directly or through a switch. Choose sender, receiver, select the length of time for the test as well as the concurrent threads, and once it’s finished, click Last test result to get detailed port statistics.
Network
This section will display current network traffic statistics for reference during the loopback network test.
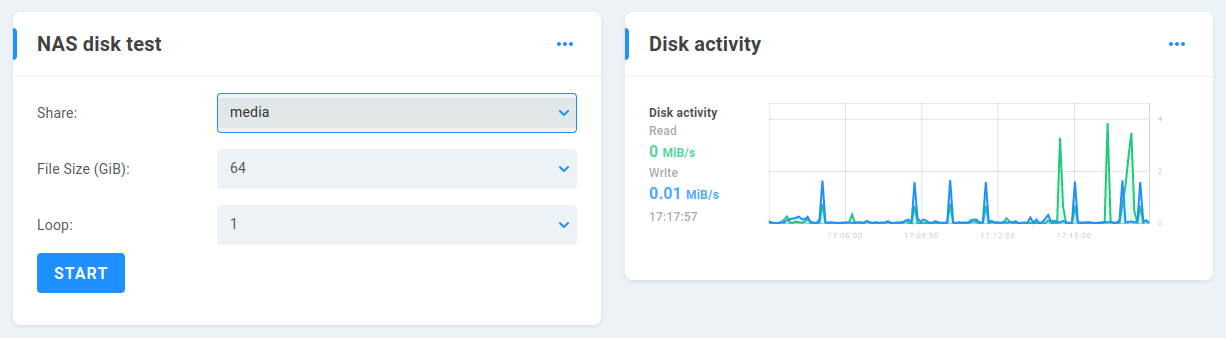
NAS Disk Test
This test allows for testing read/write file system operations on the file system (EVO share) without involving the network, and is used to confirm physical disk performance and file system behavior. Select the share(s) you’d like to test and use the default parameters or set a custom test file size and number of test iterations.
Note
Self tests may be useful in identifying potential concerns, while they should not be used to approximate real-world performance expectations, which can vary greatly.
Disk activity
This section will display current read and write statistics for reference during the NAS disk test.
Warning
These tests will not modify any existing data on your logical disks. However, the testing process will be disruptive to any other users accessing EVO. It is strongly recommended that these tests be run only while the system is otherwise idle, preferably with all Ethernet ports disconnected except for those that will be participating in or monitoring the tests.