EVO Administration
EVO offers an elegant, intuitive web-based interface for configuration, monitoring, and more. Once you have installed EVO into its physical location and made the necessary connections, use a web browser to begin familiarizing yourself with EVO’s Administrative interface.
Console
EVO is primarily managed via a web-based interface, and also presents a console menu that may be helpful for initial configuration or if the web interface is otherwise inaccessible. The console menu is accessible via a connected keyboard and display, and/or via IPMI.
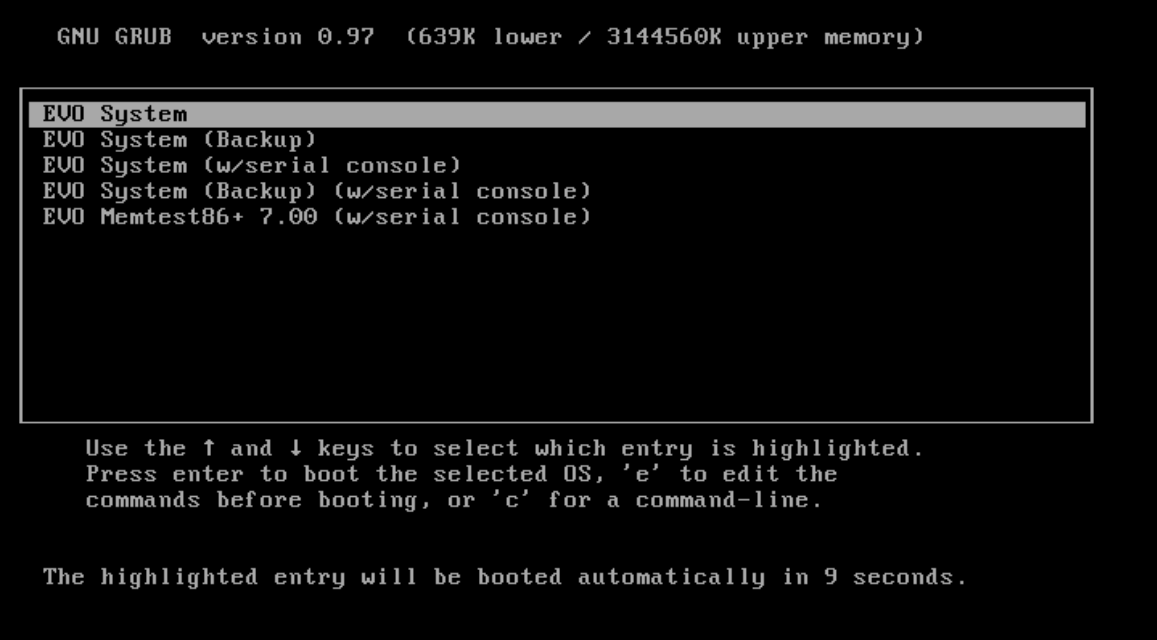
When the system starts, a menu is displayed for 10 seconds, after which the default option to boot the primary partition is chosen. Tap any key to interrupt the timer if necessary, and use the arrow keys to select another option. In addition to the primary and backup EVO boot options, the system memory can be checked using the MEMTEST utility.
Once fully booted, a menu will be presented, from which it’s possible to confirm/adjust the network interface settings. EVO has default IP addresses assigned, so a display should not normally be required.
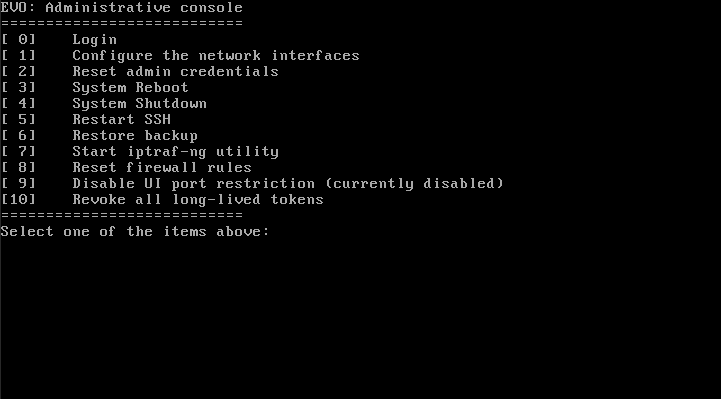
Use the arrow keys to navigate and enter key to select. Enter the number to make a selection:
[ 0] Login - Reserved for tech access
[ 1] Configure the network interfaces - View/modify the network interfaces
[ 2] Reset admin credentials - Returns web administration login to default (“admin”, “adminpw111”)
[ 3] System Reboot - Initiates graceful EVO shutdown/restart
[ 4] System Shutdown - Initiates graceful EVO shutdown
[ 5] Restart SSH - Reserved for SNS access
[ 6] Restore backup - View/restore from available EVO configuration backups as described in Recover configuration
[ 7] Start iptraf-ng utility - Start the iptraf-ng IP Network Statistics Utility
[ 8] Reset firewall rules - Remove all rules defined in the Firewall section
[ 9] Disable UI port restriction - Remove the Restrict EVO UI access rule assigning administrative access to a specific Ethernet port
[10] Revoke all long-lived tokens - Removes authentication tokens used for federated EVO configurations
[11] Reorder network interfaces - Allows for adjustment of Ethernet port enumeration
[12] Manage encrypted volumes - Provides options for logical disk encryption:
Set volume online
Encrypt volume
Change volume password
Quit
Note
Only logical disks created in EVO 7.1 or later may be encrypted.
Tip
The IP address for port ETH0 can be reset with an attached keyboard by pressing ALT+D.
Note
If configuring a port as DHCP server, the address range is specified by entering the starting IP address and ending IP address, separated by a comma.
Note
If the EVO panel includes HDMI/DisplayPort, note that video output may not be produced unless the display is connected before connecting power to EVO.
IPMI
Most EVO systems provide an IPMI network interface, accessible at 10.10.10.88. Depending on form factor, the login credentials are user admin, and password admin or adminpw111. With a keyboard and display connected, the IPMI settings can be confirmed or adjusted by entering the motherboard configuration menu at startup.
Connecting to the Administrative Interface
Default IP address - The default IP address for EVO port eth0 is 192.168.1.25 with a subnet mask of 255.255.255.0. Before attaching any EVO system to an existing network, make sure that this address is not already in use and that the subnet information is compatible with the rest of the network. If network configuration changes need to be made to the EVO system, they can be made at the Network page using a computer that is only connected to EVO and not to the existing local area network, or with a USB-connected keyboard and VGA/DisplayPort/HDMI display. The remaining documentation will assume that you will access the web-based interface using a computer that is directly attached to the primary Ethernet port on the EVO system.
Connecting to the primary Ethernet Interface - For the initial setup and configuration, connect a computer running a supported browser to the “eth0” or “eth1” interface on EVO. This computer will be referred to as the “Admin Workstation”.
EVO’s eth0 port uses a default address of 192.168.1.25.
EVO’s eth1 port uses a default role of DCHP Client, so it can be connected to a network to automatically receive an IP address.
Note
If a DHCP address is not automatically received, disconnecting and reconnecting the Ethernet cable will initiate a new DHCP request.
If connecting to eth0, set the IP address of the Admin Workstation to a matching subnet (example: 192.168.1.42) and the subnet mask to 255.255.255.0 (other Admin Workstation settings such as Router, Default Gateway, or DNS Server are unnecessary).
If connecting to eth1, check the console output from EVO menu item 1 “Configure the network interfaces”, or check the DHCP server (generally the router) to find the address assigned to EVO, and then navigate to it from a workstation on your LAN.
Connecting to the web-based Interface
To connect to EVO’s web-based interface, navigate to http://192.168.1.25 (or the DHCP-assigned address for eth1) with your web browser.
Note
If you’ve just powered up EVO, you may have to wait several minutes for the system to initialize before you can log in. Upon login, you may see EVO’s current status in its boot sequence being displayed.
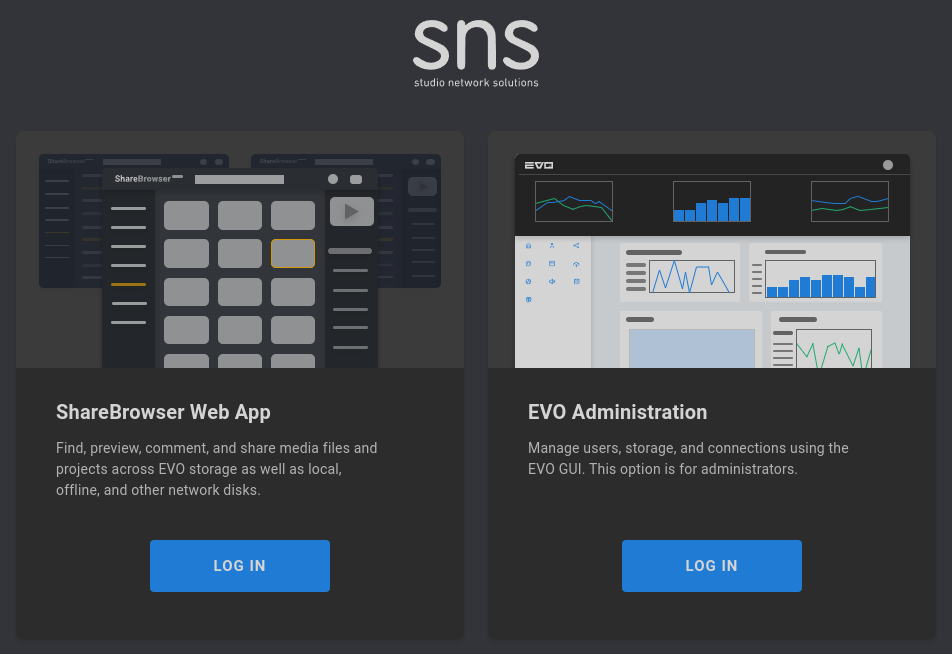
The landing page allows for ShareBrowser Web App or EVO Administration login. See the ShareBrowser guide for more information about ShareBrowser Web App: https://studio-network-solutions-sharebrowser-docs.readthedocs-hosted.com/en/latest/
Click LOG IN on the EVO Administration panel to access EVO’s administrative interface.
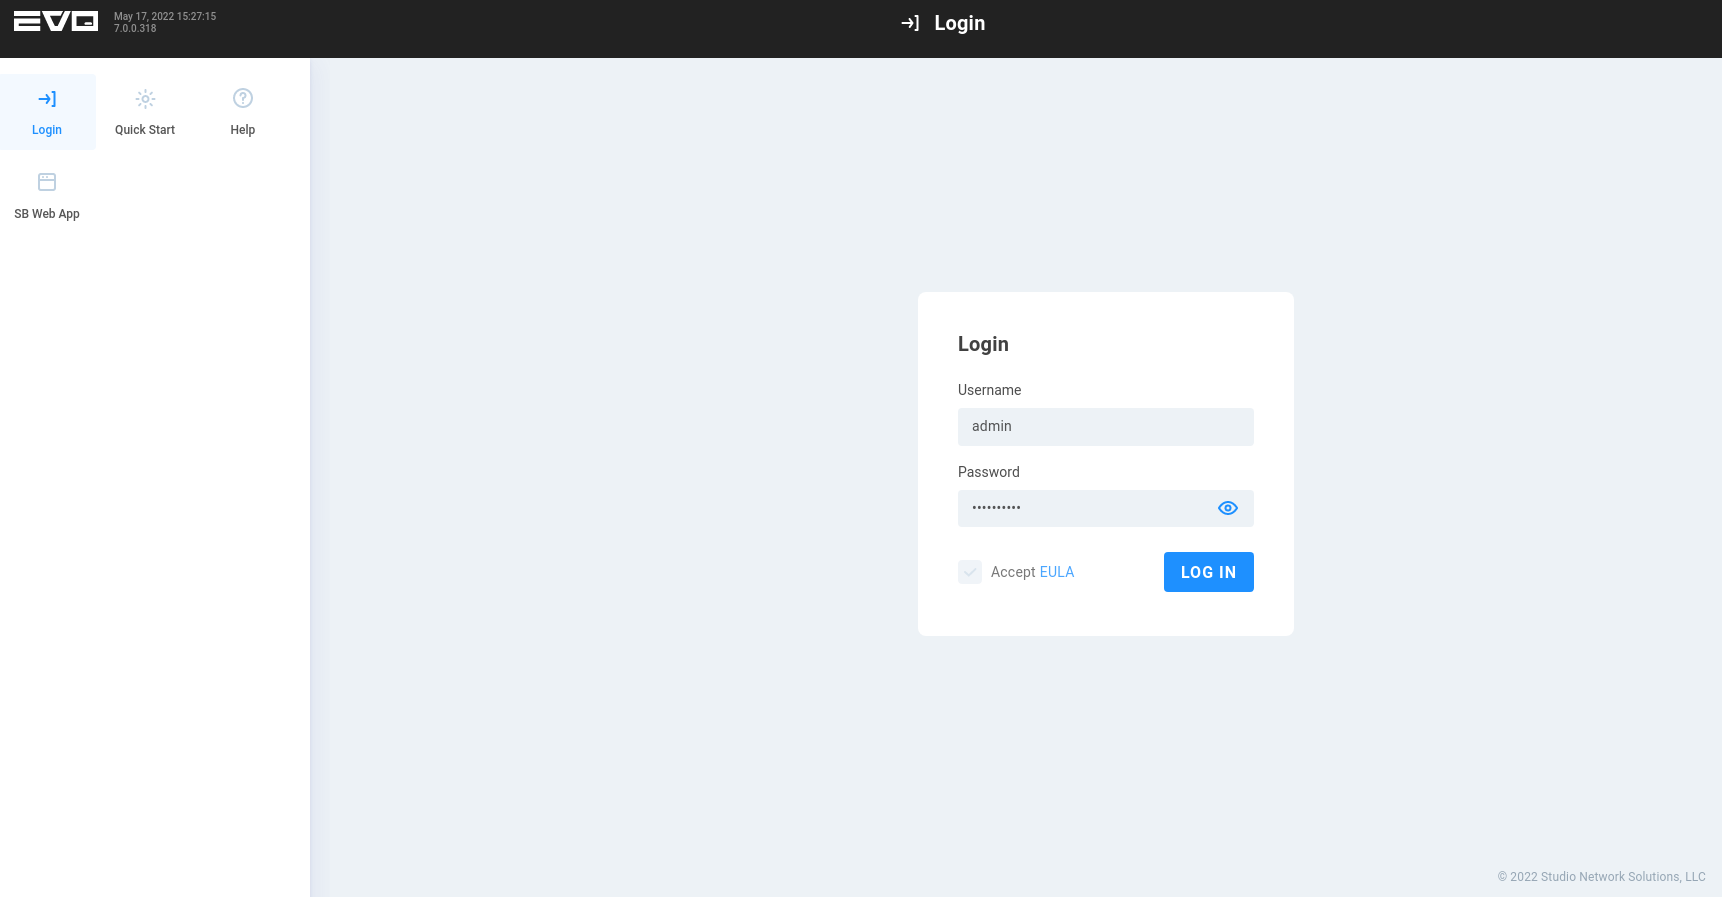
You will be greeted with EVO’s Login Page. In the top left corner, you can see the current EVO version and the EVO system time, and some helpful links are available in the menu prior to logging in.
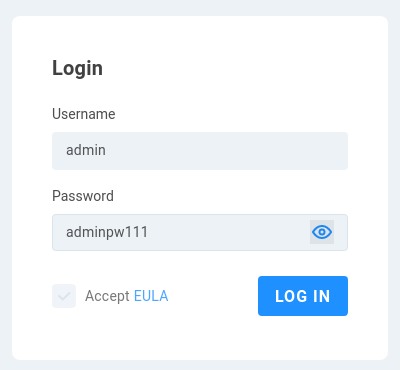
To log in to EVO, use the following default credentials:
Default User Name: admin
Default Password: adminpw111
Check the box to confirm EULA acceptance (after clicking and reviewing it), and then click LOG IN.
Note
For security reasons, it’s a good idea to change the web interface administrative user name and password at System > Admin Settings > Web-access credentials.
Administrative Interface Basics
Once logged in as the administrator, EVO’s Quick Start page is presented, which offers a brief introduction to the EVO system.
Note
Clicking the three dots (…) symbol on most displayed information cards provides the option to add (or remove) the item from the Home page, allowing the interface to be customized with the views most important to you.
Quick Start
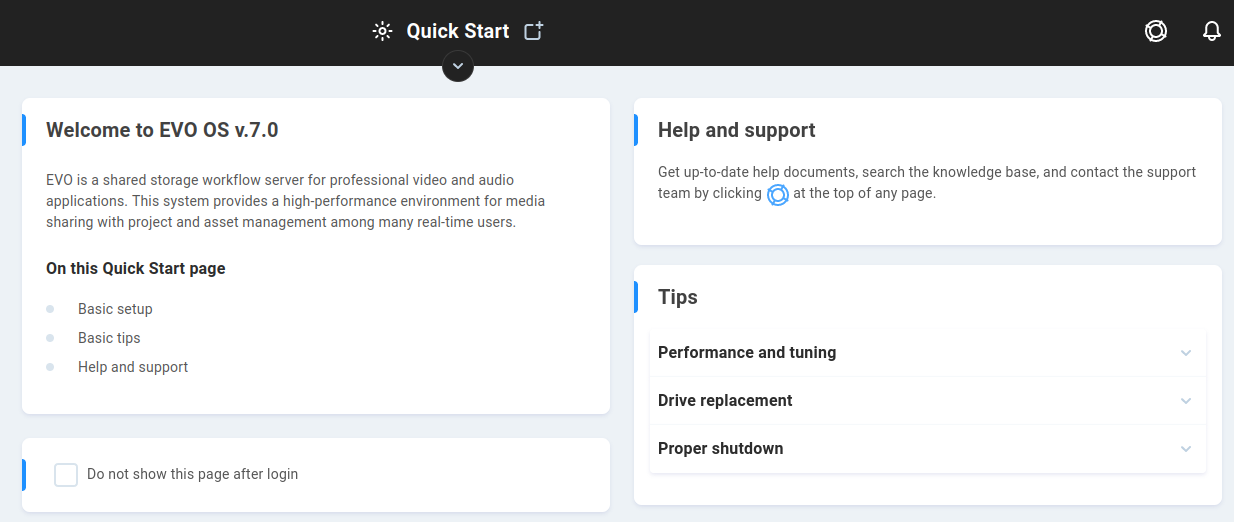
This page will load by default after logging in as the admin user, and provides important information that can be especially helpful when first getting started with EVO.
Welcome to EVO OS
This section displays the EVO operating system version number, a brief introduction, and lists the page contents.
Help and support
Get up-to-date help documents, search the knowledge base, and contact the support team by clicking the raft symbol at the top of any page. See Support for more information.
Tips
This section offers some important things to consider for correct deployment.
Performance and tuning - EVO is carefully preset right out-of-the-box to provide the best overall balanced performance for multi-user media production environments.
EVO’s management interface gives you powerful options to configure the system, and the default settings will provide excellent performance, especially for professional video editing applications. Except in rare cases, EVO’s performance settings will be perfect for most multi-user media production situations, and server-side adjustments will not be necessary.
EVO is a shared storage system, thus, it is tuned to balance a workload generated by many users concurrently demanding system resources. This is quite different than a single-user storage device such as a USB-attached RAID, wherein all resources can be safely given to one system without affecting other users. Keep in mind that if you adjust your system in a way that enables unnecessarily high throughput capabilities for every workstation all the time, then you may be inadvertently destabilizing your shared storage system’s ability to balance the demands of multiple users.
If you are not seeing expected throughput at a workstation, the cause is most commonly found to be external to EVO. Bypassing your switch and connecting the affected workstation directly to EVO is a very good first performance troubleshooting step. Other typical causes of underperformance are bad network cables, network adapter, switch, or workstation misconfiguration. Refer to these articles in the EVO Knowledge Base for recommendations, troubleshooting, and expected throughput.
Drive replacement - Follow the instructions on the Replace disk page if you need to replace a failed drive. It is always recommended that you replace a failed drive with a brand new disk.
Proper shutdown - It is important that EVO be shutdown correctly. It should be shutdown from the System page, by an APC UPS, or by tapping the power button on the front panel. The disk lights inside EVO will begin to slowly blink in a waterfall pattern (8 and 16 bay systems only) within a few seconds to indicate that the system is shutting down.
It is also possible to do a forced shutdown by pressing the front panel power button for several seconds, but this should only be done if absolutely necessary.
Note
The described LED waterfall pattern on an expansion chassis may not match the head unit in every situation. If lights persist and it’s confirmed in the interface that disks are healthy, a reboot should reset the expansion chassis LED controller.
The basics of setup
This guide outlines the sequence of a complete, basic EVO installation. Comprehensive manuals on setup, features, use, and maintenance can be found in the Help documents section located by clicking the Support raft icon at the top of any page.
If you’re doing a self-install of a new EVO, follow the steps on this page, review the online ‘Getting Started’ guide (login required), and use the Help documents to assist you along the way.
Phone-assisted installation and training services
EVO is designed for straightforward setup. However, a whole deployment “from the ground-up” can include racking, storage configuration, network setup, AD/LDAP integration, client-side OS and/or software configuration, workflow strategies, backup planning, and other concepts that may be unfamiliar to some users.
If you purchased or would like to purchase guided installation assistance and/or training, please go here for remote installation assistance or here for remote training services. Due to the one-on-one dedicated nature of these services they are outside the scope of normal technical support and are covered by our workflow team. During your scheduled appointment time, you will be in direct contact with an engineer who will provide personalized guidance by phone, email, and remote-assistance software to help with setup or training for you and your team.
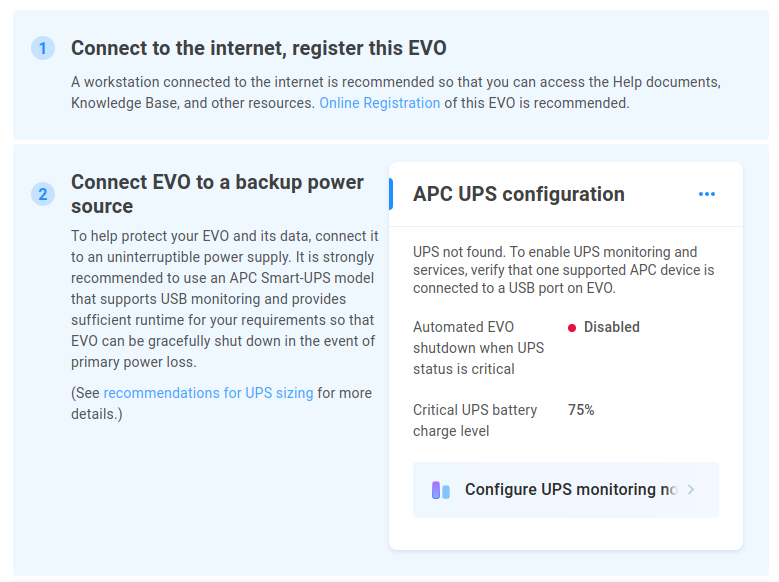
Connect to the internet, register this EVO - A workstation connected to the internet is recommended so that you can access the Help documents, Knowledge Base, and other resources. Online Registration of this EVO is recommended.
Connect EVO to a backup power source - To help protect your EVO and its data, connect it to an uninterruptible power supply. It is strongly recommended to use an APC Smart-UPS model that supports USB monitoring and provides sufficient runtime for your requirements so that EVO can be gracefully shut down in the event of primary power loss. See recommendations for UPS sizing for more details.
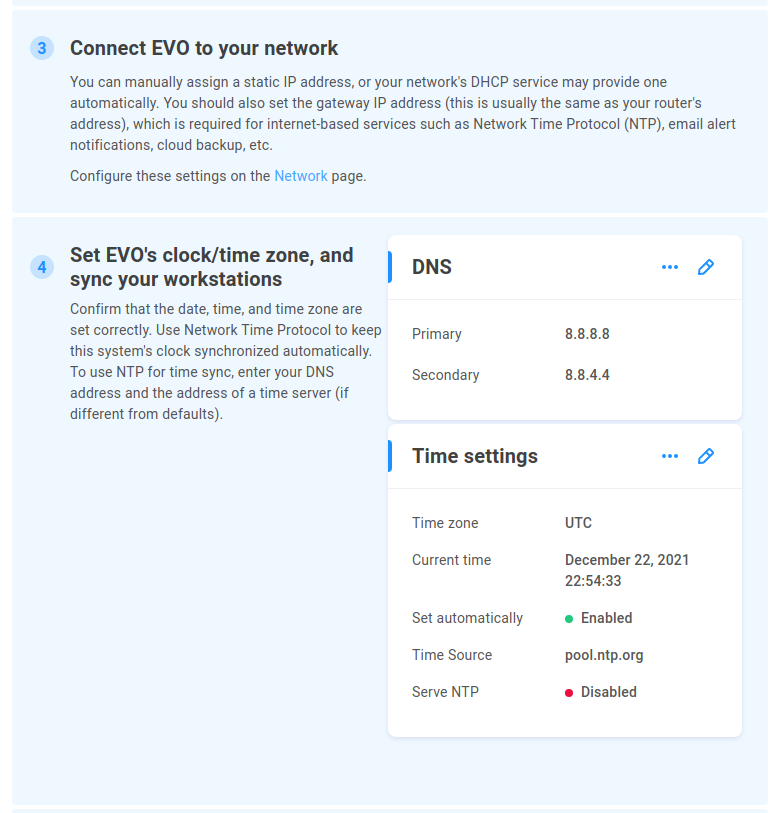
Connect EVO to your network - You can manually assign a static IP address, or your network’s DHCP service may provide one automatically. You should also set the gateway IP address (this is usually the same as your router’s address), which is required for internet-based services such as Network Time Protocol (NTP), email alert notifications, cloud backup, etc. Configure these settings on the Network page.
Set EVO’s clock/time zone, and sync your workstations - Confirm that the date, time, and time zone are set correctly. Use Network Time Protocol to keep this system’s clock synchronized automatically. To use NTP for time sync, enter your DNS address and the address of a time server (if different from defaults).
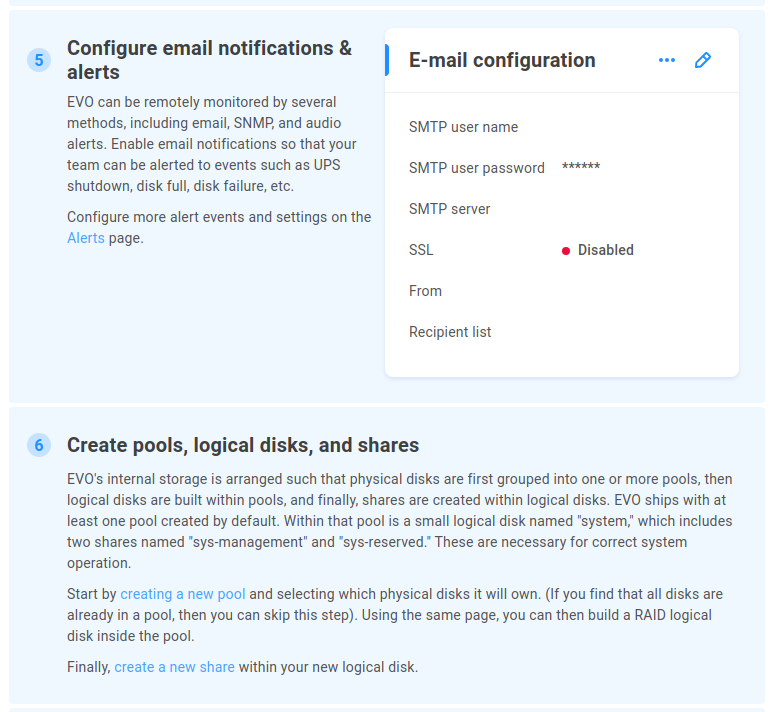
5. Configure email notifications & alerts - EVO can be remotely monitored by several methods including email, SNMP, and audio alerts. Enable email notifications so that your team can be alerted to events such as UPS shutdown, disk full, disk failure, etc. Configure more alert events and settings on the Alerts page.
6. Create users/groups and assign permissions - Access credentials (username + password) are used to control permissions to the shares, files, and other data stored on this system. You can set up and manage “local” users/groups within your EVO system, or you can configure EVO to use your existing directory server (e.g. Active Directory). Manage users, groups, and permissions on the Users & Groups page.
Create pools, logical disks, and shares - EVO’s internal storage is arranged such that physical disks are first grouped into one or more pools, then logical disks are built within pools, and finally, shares are created within logical disks. EVO ships with at least one pool created by default. Within that pool is a small logical disk named “system,” which includes two shares named “sys-management” and “sys-reserved.” These are necessary for correct system operation. Start by creating a new pool and selecting which physical disks it will own. (If you find that all disks are already in a pool, then you can skip this step). Using the same page, you can then build a RAID logical disk inside the pool. Finally, create a new share within your new logical disk.
Enable preview proxies for ShareBrowser - Your EVO includes ShareBrowser, our popular and easy-to-use MAM that enables your team to search, tag, preview, and organize media files and assets. For best results, enable ShareBrowser preview proxies for each desired share, so that lightweight versions of your media assets can be displayed to your users within ShareBrowser. In addition to these preview proxies, you may also choose to have EVO optionally create edit-ready ProRes proxies. These automatic transcoding functions are provided by EVO’s Slingshot automations engine, and they can be started/stopped on a schedule from within the Schedule section. ShareBrowser can be accessed by a web browser and by an installable application. In the bottom corner of ShareBrowser’s web-based login page, you will also find a link to the installable ShareBrowser client.
Configure backups - Although RAID can offer some protection against data loss due to disk failure, RAID is not a backup strategy. All critical data contained on any storage device, including this one, should be frequently backed up to at least one other device, and a set of your data should also be securely maintained at a separate physical location. You should back up all critical data on any shares, including the sys-management share (this share is included by default and contains copies of system databases). You may use any backup software capable of mounting and backing up data on SMB shares. You may prefer to use EVO’s included Slingshot features, which help you automatically replicate your important data to other on-site and cloud systems. Configure replication jobs on the Slingshot page.
Say hello to our support team - We want you to love your EVO! If you need help, or just want to say hello, you can contact our support team by clicking the Support raft icon at the top of any page.
Statistics

The page header provides a collapsible display of a selection of system statistics for quick reference.
Disk activity displays latest Read and Write values, as well as graphical rolling history.
Storage shows the latest filesystem status by percent used, with rolling history.
CPU shows latest load value and recent history.
Host name displays the EVO host name configured at Network service advertising.
Uptime shows time since EVO was booted in day/hour/minute/second format.
Serial number - Each EVO has a Studio Network Solutions sticker at the back of the chassis, which may be associated in this field at build time or manually added at the Push diagnostics card.
Support
Click the life raft symbol to bring up the Support page.

See Support
Notifications (bell icon)
Click the bell icon to expand the Notifications sidebar, which provides differing levels of messages in the web interface.
When hovering over the menu, three icons will appear (pin, gear, chevron).
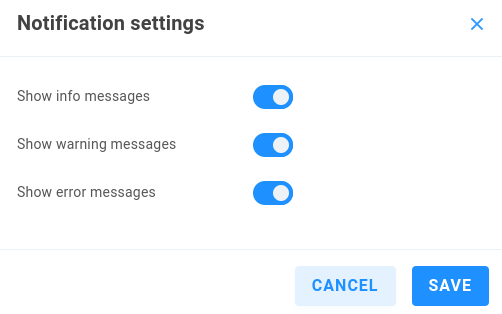
Click the pin to keep the Notifications menu open, again to unpin, or click the chevron to unpin/close the sidebar menu.
Click the gear in the sidebar to expose its options:

Show info messages - These messages are simply informative, and are displayed in blue.
Show warning messages - These messages warrant attention, and are displayed in yellow.
Show error messages - These messages require immediate attention, and are displayed in red.
Note
Be sure to configure automated email/SNMP messaging if you’d like to receive important messages when not logged in to EVO’s web interface.
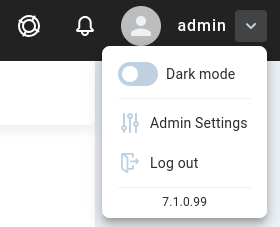
Interface User
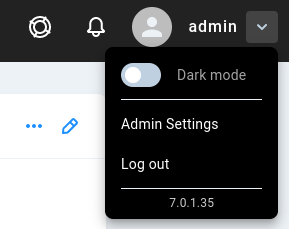
An icon and the name of the currently logged-in user are displayed. Click the down arrow to display the EVO OS version and expose the options to enable Light mode or Dark mode, access the Admin Settings page, or Log out.